Effective Feature Flags with Kotlin Multiplatform & Firebase

As mobile app developers, we are all too familiar with the risks of releasing an app with critical issues. Unlike web deployments, we don't have much control over user adoption after faulty app deployments. Users can simply download the app and continue using that version as long as their operating systems support it.
Also, as agile teams, we'd like to reduce the time gap between development and internal or external testing. What if we could build the app with unfinished features and deploy them to TestFlight or even the App Store? It might sound risky, but I've learned that this practice significantly improves the team's ability to test new features and empowers the engineering team to maintain the integration build ready for release as much as possible.
Our team is using the practice of feature flags to release major features with confidence. In this post, I'd like to share how we implement this approach for our iOS and Android apps using Kotlin Multiplatform and Firebase Remote Config.
What Are Feature Flags?
Feature flags, also known as feature toggles or feature switches, are a development practice that allows you to control the availability of certain features within your app without changing the code. Essentially, they act as conditional statements that determine whether a feature is enabled or disabled. These flags can be toggled remotely, providing the teams with dynamic control over feature rollout.
if enableMultipleLocations {
    // Multiple location experience
} else {
    // Existing experience
}
Here are some of the benefits of using feature flags:
- Risk Mitigation: Feature flags are a safety net. They enable you to hide features that might not be fully tested or polished. This reduces the risk of releasing faulty code to your entire user base. In case of unexpected issues, such as a severe bug or security vulnerability, feature flags allow you to quickly disable a feature without deploying a new version of your app.
- Progressive Rollouts: You can gradually introduce new features to your user base. Start with a small group of users, gather feedback, and expand the rollout as you gain confidence in the feature's stability.
- A/B Testing and Experimentation: Feature flags make A/B testing a breeze. You can release multiple variations of a feature to different user groups, gather data, and make informed decisions based on user behavior.
- Personalization: Feature flags enable personalized user experiences. You can tailor your app's functionality to suit different user segments, enhancing engagement and satisfaction.
- Testing Early: Turning features on or off dynamically, sometimes even locally, provides the team with the ability to do quick on-device testing. This allows you to test new features without the need to create a full build that might not be ready for release.
As we all know, all good things should come with caveats and cons. Here are the complexities associated with feature flags:
- Code Complexity: Maintaining two different scenarios in the codebase increases the volume of code and makes it more complex to manage. Additionally, there's a need to remember to remove unused code after the team decides to release the feature 100%.
- Testing Complexity: Enabling specific features and conducting tests becomes more intricate, necessitating increased effort in terms of communication and documentation for efficient testing.
Setting Up Feature Flags
Before you can start experimenting with feature releases, you need to set up feature flags in your app. Fortunately, many tools and libraries are available to help you manage feature flags with ease. Here's how to get started:
- Choose a Solution: Select a feature flagging service or library that suits your app's needs. Some popular options include LaunchDarkly, Split.io, and Unleash. Our team uses Firebase Remote Config because it's cost-effective and its feature set aligns with our team's needs.
- Integrate the Solution: Integrate your chosen feature flagging solution into your mobile app for iOS and Android.
- Create Feature Flags: Within your chosen tool, you can create feature flags for the features you want to control. Define the variations or conditions under which the features should be visible or hidden.
- Local Control: This step could be a nice addition or an essential one, depending on your team's requirements. Add a developer menu to your app and implement the ability to choose different options locally, allowing your team to quickly test various variants.
- Remote Control: This is where you can turn features on or off without deploying new versions of your app. You have a few options to consider. You could enable the feature for 100% of users, or you can release the feature progressively. You can also do A/B testing to measure its success and make decisions later. When you encounter critical issues or when data shows that the changes are not effective, you can simply disable the feature.
Feature Flag Example: Kotlin Multiplatform + Firebase Remote Config
Our team is using Kotlin Multiplatform (KMP) to support both iOS and Android apps, enabling us to write less code, develop features faster, and significantly reduce bugs. Here's how we use KMP and Firebase Remote Config to implement feature flags effectively. We used some dependencies and architectural patterns, but it doesn't have to be this specific way to implement feature flags. I provided the actual code example for our stack and explained why we're doing it this way, hoping it might give you an idea of how to implement feature flags in a multi-platform setup for your project.
1. Create the Project
You can follow this guide to create a Kotlin Multiplatform app project.
2. Integrate Firebase Remote Config
Use these official guides for iOS and Android to set up Firebase and Firebase Remote Config.
We can create this controller class to fetch and activate Remote Config.
class RemoteConfigController {
    static let shared = RemoteConfigController()

    private let remoteConfig = RemoteConfig.remoteConfig()

    init() {
        let settings = RemoteConfigSettings()
        #if targetEnvironment(simulator)
        settings.minimumFetchInterval = 0
        #endif
        remoteConfig.configSettings = settings
    }

    func fetch() {
        remoteConfig.fetchAndActivate { status, error in
            if status == .successFetchedFromRemote {
                // TODO: Update app state
            }
        }
    }
}
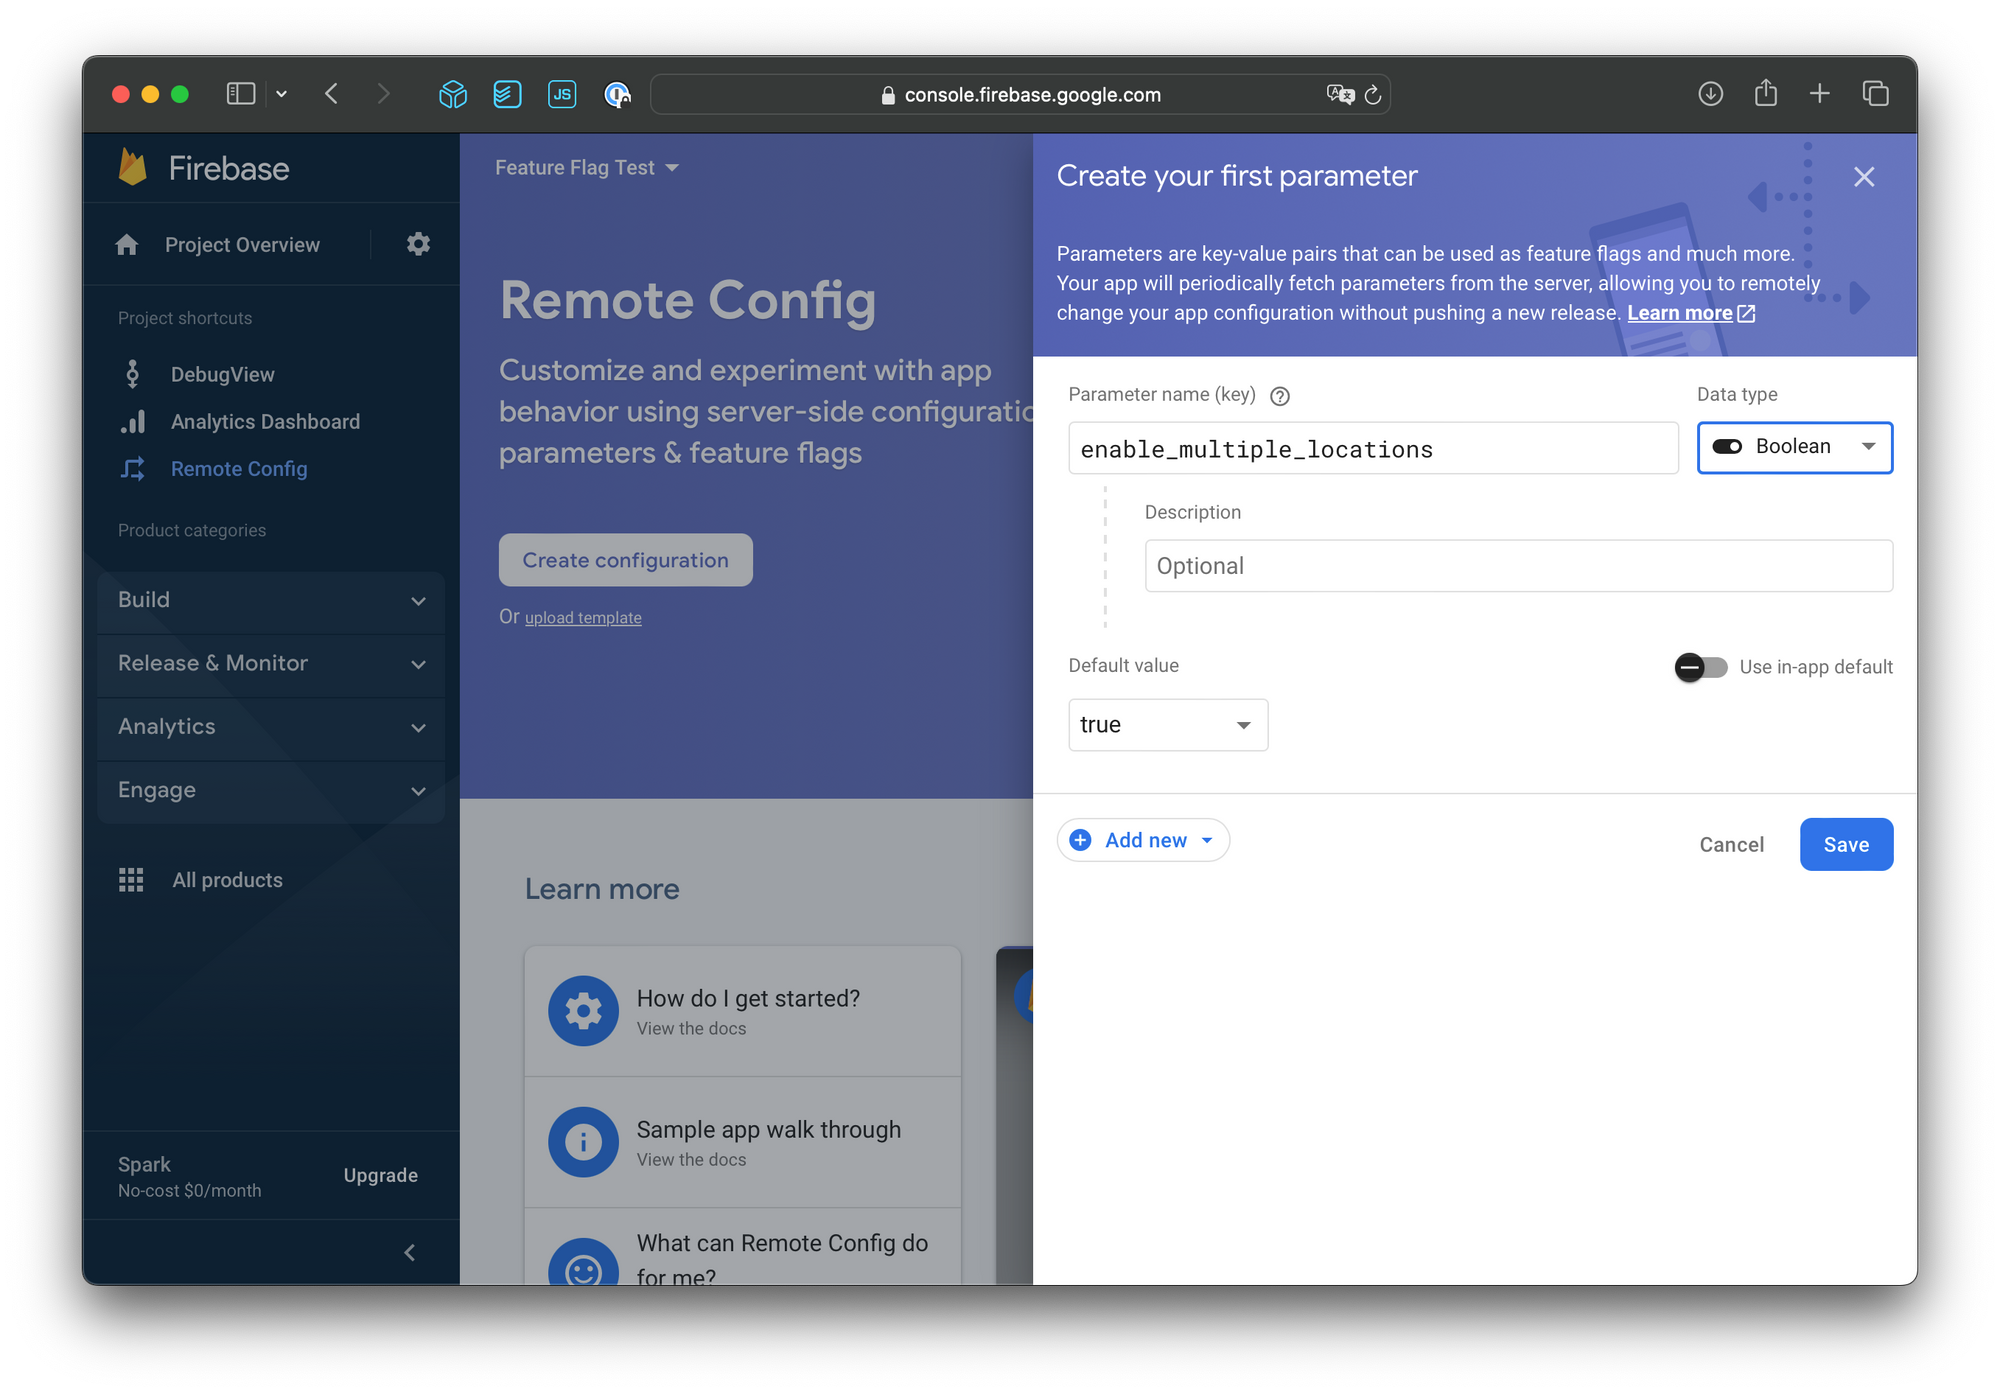
3. Define Firebase Remote Config Keys
Define enable_multiple_locations as a boolean. If set to true, we will show the new experience (multiple locations); otherwise, we will show the old experience (single location).
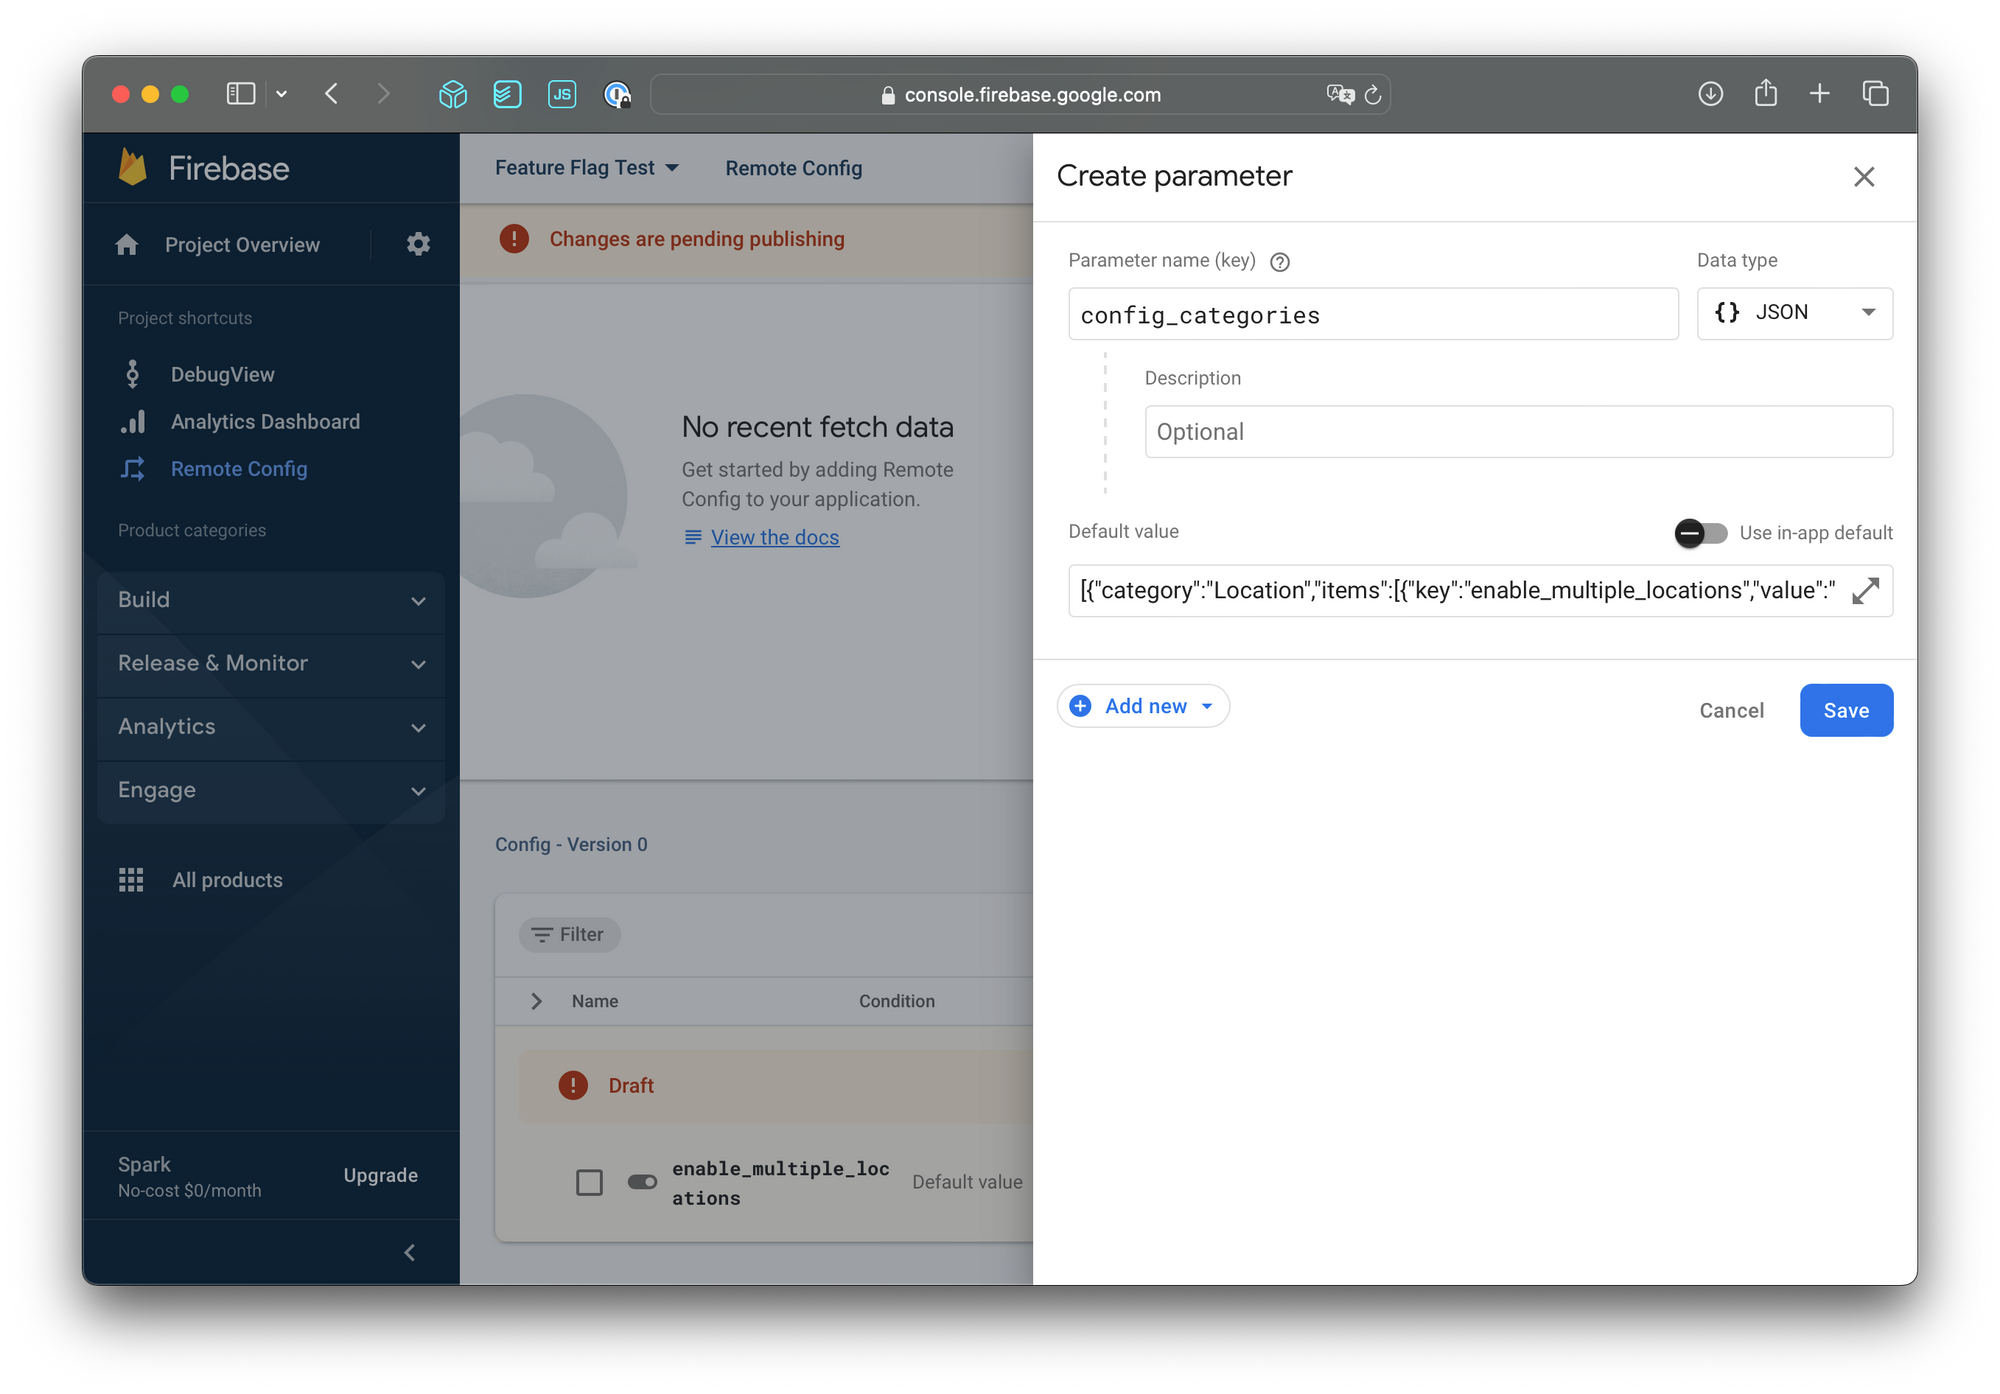
Define config_categories for local control. We would like to display a list of Remote Config keys that can be updated locally using another Remote Config key. We have found this approach to work well since it allows us to update potential values or even remove ones that are no longer used remotely. Below is an example value, and we can specify the list of Firebase Remote keys, their names (titles), descriptions, and potential values.
[
  {
    "category": "Location",
    "items": [
      {
        "key": "enable_multiple_locations",
        "value": "true|false",
        "title": "Multiple Locations",
        "description": "Aliquip ullamco et cupidatat ad occaecat nulla nostrud sint dolor aute sit."
      }
    ]
  }
]
3. Implement Shared Logic
The goal is to use Kotlin Multiplatform to write feature flag-related logic once and utilize it from both iOS and Android. We will use Kotlin Serialization to parse the Remote Config values.
State
State data classes are immutable and consist of member variables (the source of truth) and computed properties (derived data). AppState has the helper method enableMultipleLocations to distinguish the experience. ConfigState has the helper methods (string(), bool()) to retrieve the config data with the desired types.
Also, it's worth mentioning that the string(key: ConfigKey) method will attempt to use locally updated values first and fall back to remotely updated values if they don't exist.
AppState.kt
@Serializable
data class AppState(
    val config: ConfigState = ConfigState(),
) {
    val enableMultipleLocations: Boolean
        get() = config.bool(ConfigKey.enable_multiple_locations)
}
ConfigState.kt
@Serializable
data class ConfigState(
    internal val remoteData: Map<String, String?> = mapOf(),
    internal val localData: Map<String, String?> = mapOf(),
) {
    fun string(key: ConfigKey): String? {
        return localData[key.name] ?: remoteData[key.name]
    }

    fun bool(key: ConfigKey): Boolean {
        return string(key).toBoolean()
    }

    val configCategories: List<ConfigCategory>
        get() = string(ConfigKey.config_categories)?.let {
            val json = Json { ignoreUnknownKeys = true }
            json.decodeFromString(ListSerializer(ConfigCategory.serializer()), it)
        } ?: listOf()
}
ConfigKey
One of the potential issues of using Firebase Remote Config from both iOS and Android is typos in the keys. We decided to define the keys as a shared enum so that we can detect typos at compile time. Firebase Remote Config expects keys to be in snake_case, so we define them accordingly and add suppressions to avoid linter errors.
ConfigKey.kt
@Suppress("EnumEntryName")
enum class ConfigKey {
    enable_multiple_locations,
    config_categories,
}
ConfigCategory, ConfigItem
Define serializable data classes for parsing config_categories values. ConfigItem includes the computed property values, which allows you to specify "value": "true|false" within the config_categories key and list them as two options, for example.
ConfigCategory.kt
@Serializable
data class ConfigCategory(
    @SerialName("category")
    val category: String,
    @SerialName("items")
    val items: List<ConfigItem>,
)
ConfigItem.kt
@Serializable
data class ConfigItem(
    @SerialName("key")
    val key: String,
    @SerialName("value")
    private val value: String,
    @SerialName("title")
    val title: String? = null,
    @SerialName("description")
    val descriptionText: String? = null,
) {
    val configKey: ConfigKey?
        get() = try {
            ConfigKey.valueOf(key)
        } catch (e: Throwable) {
            null
        }

    val values: List<String>
        get() = value.split("|")
}
CommonViewModel, StateManager
These classes have glue code to implement the MVI (Model - View - Intent) pattern. They make use of Kotlin Coroutine's StateFlow.
CommonViewModel.kt
class CommonViewModel {
    val stateFlow: StateFlow<AppState>
        get() = stateManager.mutableStateFlow

    internal val stateManager by lazy { StateManager() }

    // for iOS
    fun onChange(handler: (AppState) -> Unit): Closeable {
        val job = Job()
        stateFlow.onEach {
            handler(it)
        }.launchIn(
            CoroutineScope(Dispatchers.Main + job),
        )
        return object : Closeable {
            override fun close() {
                job.cancel()
            }
        }
    }
}
StateManager.kt
internal class StateManager {
    internal val mutableStateFlow = MutableStateFlow(AppState())

    internal var state: AppState
        get() = mutableStateFlow.value
        set(value) { mutableStateFlow.value = value }
}
Reducers
Reducer methods will update the app state, and we can ensure consistent output when given the same input.
ConfigReducer.kt
internal fun StateManager.configUpdateRemoteData(data: Map<String, String?>) {
    state = state.copy(
        config = state.config.copy(
            remoteData = data,
        ),
    )
}

internal fun StateManager.configSetLocalData(key: String, value: String) {
    state = state.copy(
        config = state.config.copy(
            localData = state.config.localData + mapOf(key to value),
        ),
    )
}

internal fun StateManager.configResetLocalData(key: String) {
    state = state.copy(
        config = state.config.copy(
            localData = state.config.localData.filter { it.key != key },
        ),
    )
}

internal fun StateManager.configResetAllLocalData() {
    state = state.copy(
        config = state.config.copy(
            localData = mapOf(),
        ),
    )
}
Events
Event methods are directly called by the iOS and Android client apps, triggering the appropriate reducer methods.
ConfigEvents.kt
fun CommonViewModel.updateConfig(data: Map<String, String?>) {
    stateManager.configUpdateRemoteData(data)
}

fun CommonViewModel.setConfig(key: String, value: String) {
    stateManager.configSetLocalData(key, value)
}

fun CommonViewModel.resetConfig(key: String) {
    stateManager.configResetLocalData(key)
}

fun CommonViewModel.clearConfig() {
    stateManager.configResetAllLocalData()
}
4. Implement Client Code
We can update the RemoteConfigController to call the shared method as shown below:
class RemoteConfigController {
    static let shared = RemoteConfigController()

    private let remoteConfig = RemoteConfig.remoteConfig()

    init() {
        ...
    }

    func fetch() {
        remoteConfig.fetchAndActivate { status, error in
            if status == .successFetchedFromRemote {
                DispatchQueue.main.async { [unowned self] in
                    self.updateRemoteData()
                }
            }
        }
    }

    private func updateRemoteData() {
        let data = dictionary(from: .default).merging(dictionary(from: .remote)) { _, rhs in
            rhs
        }
        AppViewModel.shared.model.updateConfig(data: data as [String: Any])
    }

    private func dictionary(from source: RemoteConfigSource) -> [String: String?] {
        let allKeys: [String] = remoteConfig.allKeys(from: source)
        let allValues: [String?] = allKeys.map {
            remoteConfig.configValue(forKey: $0).stringValue
        }
        return Dictionary(uniqueKeysWithValues: zip(allKeys, allValues))
    }
}
AppViewModel
Now, it's time to add the client-specific code. For the purpose of this post, we will showcase the Swift & SwiftUI code for iOS only, but you can apply a very similar pattern using Kotlin & Jetpack Compose for Android. Please note that we needed some glue code to facilitate data propagation from Kotlin Coroutine's StateFlow to iOS's @Published variable.
AppViewModel.swift
class AppViewModel: ObservableObject {
    static let shared = AppViewModel()

    let model: CommonViewModel

    @Published var appState: AppState

    private var closeable: Ktor_ioCloseable?

    init() {
        model = CommonViewModel()
        appState = model.stateFlow.value as! AppState

        closeable = model.onChange { [weak self] appState in
            self?.appState = appState
        }
    }
}
Content View
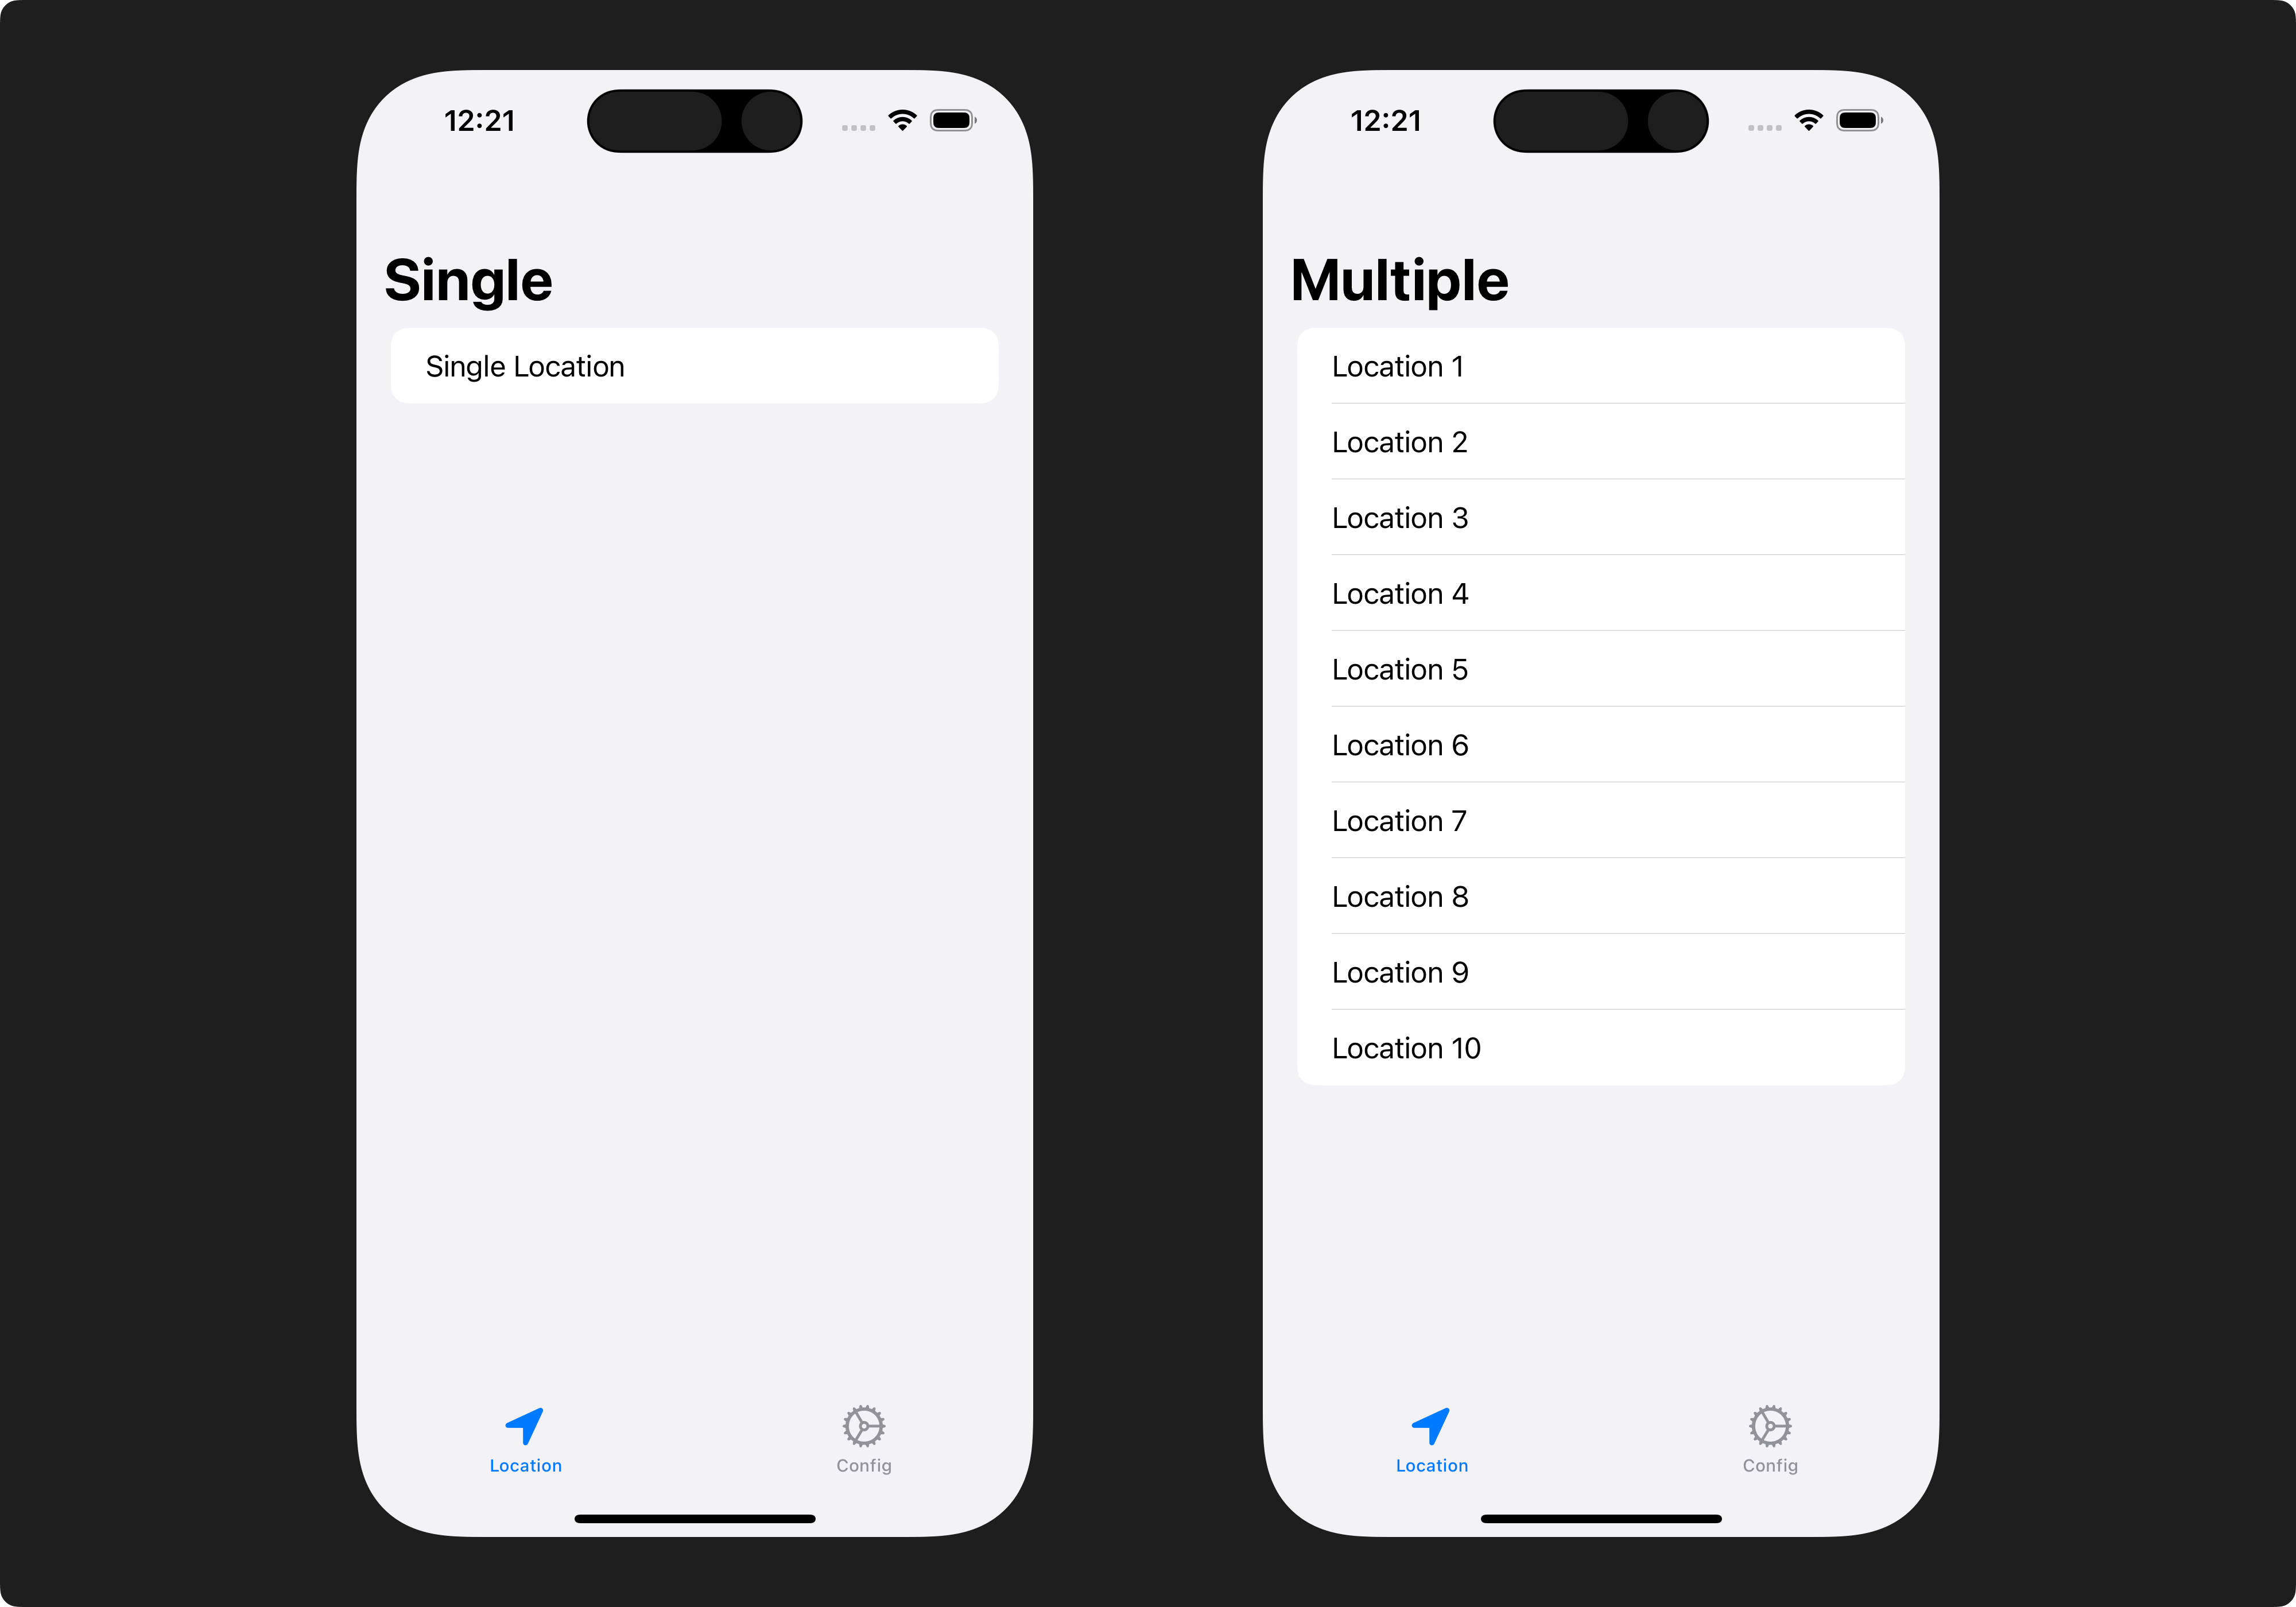
Here's an example implementation of the app's primary view. The condition appViewModel.appState.enableMultipleLocations determines which experience you'll see.
ContentView.swift
struct ContentView: View {
    @ObservedObject private var appViewModel = AppViewModel.shared

    var body: some View {
        TabView {
            NavigationStack {
                if appViewModel.appState.enableMultipleLocations {
                    // Multiple locations experience
                    List {
                        ForEach(1...10, id: \.self) { index in
                            Text("Location \(index)")
                        }
                    }
                    .navigationTitle("Multiple")
                } else {
                    // Single location experience
                    List {
                        Text("Single Location")
                    }
                    .navigationTitle("Single")
                }
            }
            .tabItem {
                Label("Location", systemImage: "location.fill")
            }

            NavigationStack {
                ConfigView()
                    .navigationTitle("Config")
            }
            .tabItem {
                Label("Config", systemImage: "gear")
            }
        }
    }
}
If appViewModel.appState.enableMultipleLocations is false, you'll see the screen on the left. Otherwise, you'll see the screen on the right.
ConfigView, ConfigSelectView
These views are for internal testing purposes. They display the list of Firebase Remote Config keys that the app uses to distinguish the experience, and they allow you to choose various values locally for testing.
ConfigView.swift
struct ConfigView: View {
    @ObservedObject private var appViewModel = AppViewModel.shared

    func itemView(item: ConfigItem) -> some View {
        NavigationLink(destination: ConfigSelectView(item: item)) {
            HStack {
                VStack(alignment: .leading) {
                    if let title = item.title {
                        Text(title)
                            .foregroundColor(.primary)
                    }

                    Text(item.key)
                        .font(.footnote)
                        .foregroundColor(.secondary)
                }

                Spacer()

                if let configKey = item.configKey, let value = appViewModel.appState.config.string(key: configKey) {
                    Text(value)
                }
            }
        }
    }

    var body: some View {
        List {
            ForEach(appViewModel.appState.config.configCategories, id: \.self) { category in
                Section(header: Text(category.category)) {
                    ForEach(category.items, id:
                            \.self) { item in
                        itemView(item: item)
                    }
                }
            }

            Section {
                Button {
                    appViewModel.model.clearConfig()
                } label: {
                    Text("Clear All")
                        .font(.headline)
                        .foregroundColor(.red)
                }
            }
        }
        .navigationBarTitle("Config")
    }
}
ConfigSelectView.swift
struct ConfigSelectView: View {
    let item: ConfigItem
    @ObservedObject var appViewModel = AppViewModel.shared

    var headerView: some View {
        Section {
            VStack(alignment: .leading) {
                if let description = item.descriptionText {
                    Text(description)
                        .font(.body)
                }

                Text(item.key)
                    .font(.footnote)
                    .foregroundColor(.secondary)
            }
        }
        .padding()
    }

    var listView: some View {
        List {
            Section(header: Text("Select")) {
                ForEach(item.values, id: \.self) { value in
                    Button {
                        appViewModel.model.setConfig(key: item.key, value: value)
                    } label: {
                        HStack {
                            Text(value)
                                .foregroundColor(.primary)

                            Spacer()

                            if let configKey = item.configKey, appViewModel.appState.config.string(key: configKey) == value {
                                Image(systemName: "checkmark")
                                    .foregroundColor(.primary)
                            }
                        }
                    }
                }
            }

            Section {
                Button {
                    appViewModel.model.resetConfig(key: item.key)
                } label: {
                    Text("Clear")
                        .font(.headline)
                        .foregroundColor(.red)
                }
            }
        }
        .listStyle(.insetGrouped)
    }

    var body: some View {
        VStack(alignment: .leading) {
            headerView

            listView
        }
        .navigationBarTitle(item.title ?? "")
    }
}

If we put everything together and run the app, we now have the ability to differentiate the user experience based on the Firebase Remote Config value. We can even use different values locally using the Config screen.
Conclusion
Feature flags are a game-changer for mobile app developers. They empower you to make data-driven decisions, reduce risks, and enhance the user experience. Start experimenting with feature flags, and you'll discover a world of possibilities for feature optimization and user engagement.